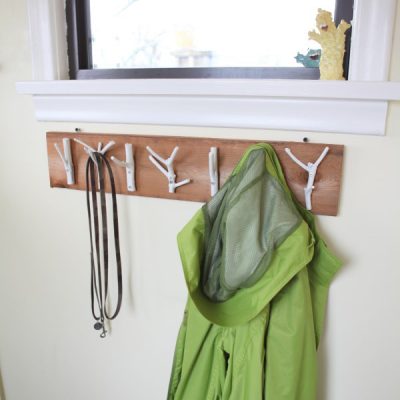
Branching Out: My Project in Women’s Day

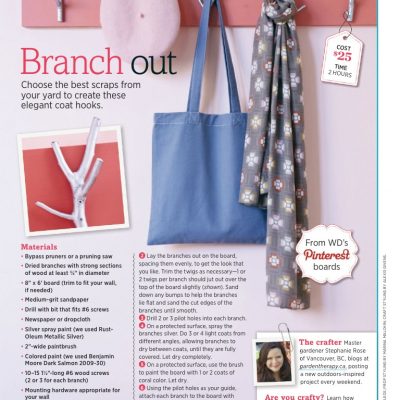
If you don’t have the February 2013 issue of Women’s Day magazine yet, then go get it! I’ll wait….

…Ok, now turn to page 48. Yup, that’s me and my branch coat rack project in Genius Ideas (why, thank you.).

A few months ago I was contacted by the magazine about the Branch Coat Rack project I shared on Women’s Day’s DIY Pinterest Board. I was happy to share the project and have been looking forward to how they would design it for the magazine. Here is the result.

Women's Day Feb 2013 Branch Out

I love their take on the project with silver sprayed branches and a rosy pink back board. I still also love the colours I used for my coat rack, with white branches and natural wood back, but it just goes to show you how a DIY project can take on a personal flare.  Here is the original:

What do you think: do you love the pink and silver, the more natural look, or do you have your own ideas?

Share

Branch Coat Rack Tutorial

This inexpensive and easy weekend project shows you how to create a stylish coat rack with just some branches, paint, and a few tools.

Materials:

  • Branches with strong sections of wood that are no smaller than ¾” in diameter
  • Bypass pruners / pruning saw
  • Cedar plank or other raw, natural wood
  • Drill / screwdriver
  • Wood screws
  • White latex paint

Directions:

1. Using the saw of bypass pruners, cut sections of branches that:

a) have a nice shape to make a hook

b) are thick enough in diameter and strong enough to hold coats, etc when mounted

c) have a straight, flat back to lie against the cedar plank when mounted

2. Lay your branches out on your board to get the pattern and look that you like.  If wood is green, then it must dry before you use it.  Place in a warm, dry room until the wood turns brown.

3. Sand the edges of the branches lightly so that there are no sharp edges to snag your stuff.

4. Drill pilot holes in the wood with a thin drill bit, this will help the screw go through the wood without splitting.  It is a good idea to have a few extras as backup though.

5. Add about ¼ cup water to 1 cup of white latex paint in a lidded container (like a large yogurt container) and stir.  Drop each branch into the thinned-out paint, replace lid, and shake until branch is thoroughly coated.  Place on a piece of wax paper or parchment to dry.  Repeat with a second coat for a thicker paint look, although only one coat was used in this project as I like the wood coming through a bit.  Touch up with a brush if necessary.

6. Using thin 1 ¼” screws, carefully drill each branch through the pilot hole onto the back board.

7. Mount the coat rack on the wall.

Thanks for visiting for the weekend project.


Share
2012 (c) Copyright Garden Therapy