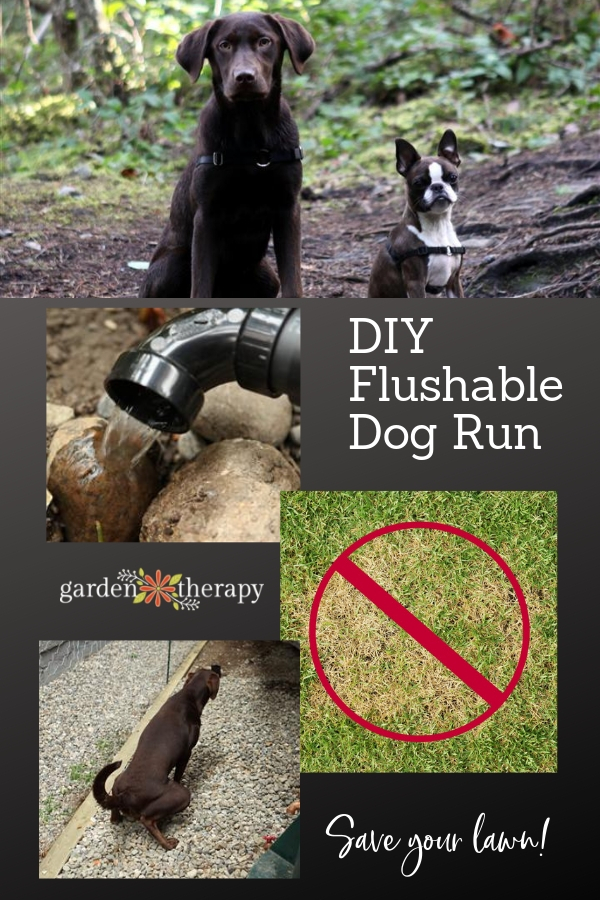
How to build a Doggy John, or a flushable dog run for our Weekend Project. This clever dog run has made our yard even more pet friendly, while keeping the lawn green and healthy. You can make your own flushable doggy john easily. Your dogs and your lawn will thank you!
If you want to protect your lawn from doggie business so it stays pretty and usable, it is incredibly easy to teach the mutts to use a dog run. With some training consistency, lots of liver treats, and your dog’s desire to keep you happy, you can say goodbye to dog poop for ever (on you lawn at least).
The Culprits

First let me introduce the team of terrors that inspired this project, Lou and Meatball. Can you guess which is which? Lou is the food-crazy English Lab and Meatball is the freakishly small Boston Terrier.
The Problem

Additionally, Lou and Meatball where not pleased with the odor themselves and soon refused to continue peeing at the location. I tried to flush the area with water. That provided relief for a couple of days but the water soon dried up and the ammonium was left behind, and so was the putrid stink!
The Solution
I realized I had to find a way to flush the urine out of the area, so I decided to make the little stinkers their very own flushable toilet. Luckily at that location there is a rain barrel with an overflow spout that pipes into the drain tile and off the property. Basically what I did was remove the soil, dig a trench, covered the area in thick plastic, installed a perforated pipe that tied into the exterior plumbing, covered it all up with gravel, and voila! I call it the Doggy John. Lou and Meatball use the area as trained and I flush it once every few weeks with a hose. The plastic keeps the urine from penetrating the soil and ensures that all of the water is directed to the perforated pipe so that it may be flushed away. The rest of the post shows you how to build your very own Doggy John.
Materials List

1. 4” Perforated Big-O drain pipe – about 15 feet.
2. 4” Coupler – used to join two pieces of Big-O drain pipe together
3. Filter cloth – used to wrap the Big-O pipe to help keep dirt out of the drain
4. 4” to 1 ½” Reducer – used to connect Big-O into 1 ½” plumbing pipe
5. 1 ½” T-Connector – used to tie in the Big-O into the existing plumbing
6. 1 ½” Coupler – used to join two pieces of 1 ½” plumbing pipe together
7. 1 ½” PVC plumbing pipe
8. PVC pipe cement – used to glue plumbing pipes together
9. Heavy duty plastic sheet – used to cover ground (Note: picture shows 2mm plastic. In hind-sight go with a thicker 6mm plastic sheet
10. Clean gravel – used to cover entire Doggy John
11. Level – used to ensure that all Big-O and piping is slopping towards the drain tile so gravity feeds the water away.
12. Shovel – for digging the trench
13. Gloves – you are going to want a good pair
14. Tape measure – measuring is involved
15. Duct-tape – used to tape the filter cloth to the Big-O
16. Hack saw – used to cut the Big-O and PVC pipes
17. Knife – for cutting tape, plastic sheet and filter cloth
18. Rake – to smooth things out
19. Tool belt – so you can carry your tools
20. Meatball – not required for this part of the project
Step 1 – Tie into existing plumbing
The first step is to tie into the existing plumbing. Obviously my plumbing will be different from yours. Remember that all of your piping should be graded so that it flows the water away from the area. The grade should be at least 1/2” slope for every 4 feet of pipe.

Using the hack saw, cut the existing PVC pipe at both sides of the 90 degree elbow. File any rough edges on the existing pipe to ensure they are square.

Glue in the 1 ½” T-connector so that the two-pipes are reconnected and the top of the tee is pointing to where you Big-O drain will be laid. Note: When gluing, ensure that you apply glue to the female end of the T-connector (the part where the pipe fits into). Also make certain that you don’t over glue and have it pool. Work quickly as the glue sets fast.

Glue in the 4” to 1 ½” Reducer to the 1 ½” T-connector.

Step 2 – Dig out your trench
Now comes the fun part. Grab your shovel and dig out a trench! Starting from the 4” to 1 ½” Reducer you will want to dig a trench that is about 12” wide and as long as the Doggy John area (mine is about 15 feet). Normally when digging drainage pipes you dig down about 16”; however, in this case you only have to dig as deep as the bottom part of the 4” to 1 ½” Reducer opening. If you dig much deeper than that then water will have to fill the bottom of the trench before it is able to flow out the pipe. Remember to use the level and ensure that your trench continues to drain away from the area at a rate of at least ½” for every four feet of length.

You can pile the soil at the side of your trench. You will want to use your rake to gently grade the surrounding ground so that it slopes into the trench. This ensures that when you flush the Doggy John with the hose the water flows to the trench and down the Big-O.
Step 3 – Lay down plastic

Once your trench is dug and the surrounding ground is graded towards the trench, lay down your heavy duty 6mm plastic sheet. If a single sheet doesn’t fit then you can overlap another sheet. Just remember that when overlapping the top sheet should be the one higher up the grade (like roof shingles).
Use some duct tape to hold down your plastic sheet. You should also leave it long and wide; you will trim it at the end.
Step 4 – Install your Big-O in the trench

Cover the pipe with filter (landscaping) fabric. Use duct tape to hold the fabric in place. The fabric will prevent soil from clogging the holes on the pipe while still allowing water to drain through and into the pipe. Without the fabric, dirt could enter the pipe through the holes and prevent drainage.

Shovel a thin layer of clean gravel into the trench on top of the plastic sheet. Lay the Big-O pipe on top of the gravel and connect with the 4” to 1 ½” Reducer. Use the 4” Coupler if you need to connect two pieces of Big-O together. Tip: If the Big-O pipe won’t lay flat you can temporarily hold it in place with some bricks or rocks.
At the top of the Big-O pipe (the opposite side of where it ties into the plumbing) you can connect a flexible 4” elbow that sticks up above grade. This can be used as a cleanout if necessary in the future.

Step 5 – Test drainage
Now test to see how well things drain. Make sure to do this BEFORE covering the Big-O pipe with gravel. Grab a hose and spray it over your pipe and plastic. Hopefully you will notice the water run down the plastic sheet towards the trench and down the Big-O pipe. This image below shows the water flowing out the pipe that will eventually be connected into the underground drain tile. SUCCESS!

Step 6 – Cover it all up with gravel
Fill in the rest of the trench with more clean gravel and make sure that the Big-O pipe is fully covered. Smooth out the plastic sheet that covers the rest of the Doggy John area and lay at least a 3” thick layer of gravel to cover the area. If you have a male pooch you will want to put a peeing post in the area (something he can lift his leg on).

Clean up the poop regularly and give the area a good flush once every two or three weeks and your puppies will be able to enjoy their odor-free Doggy John for many years to come.

More Pet-Friendly Projects:
- Safe Gardening with Cats and Dogs: Common Garden Plants Poisonous to Pets
- All-Natural Dog Deodorant Spray
- Herbal Anti-Flea Shampoo Recipe
- The Homemade Dog Cookies that Make Dogs Go Squirrely
A city girl who learned to garden and it changed everything. Author, artist, Master Gardener. Better living through plants.


Is there a way to use artificial turf instead of gravel for this project? I’m not worried about dog spots in the yard; my dog is allergic to grass and it’s terrible watching him scratch like crazy after a bathroom run.
Hi Samantha, poor pup!! Could you replace your lawn with ground covers like clover or mosses? Natural is the way to go if you can. I don’t think artificial turf is a good solution. It will get stinky as the urine and poop build up. It will take a lot more maintenance to keep it clean. Plus, it’s a plastic product so hard on the earth.
Try K9grass, it is made for dogs. Uses a backing that allows ruin to flow through, regular artifical turf only has drainage holes in the backing.
I’m not sure what you mean “by tieing into the plumbing”. I’d wonder how this would work on a slope. I’d like to place this on the side of my house but there is quite a slope there. What do you think? Would that work or would it end up being smelly at the bottom?
Hi Rose, you can dig a French Drain at the bottom of the slope and have the big-O pipe drain into that. Here is an article on how to do it. http://www.hgtv.com/remodel/outdoors/how-to-install-french-drains.
I want to build this at my home for my own dogs. I had the plumber install a separate drain into the sewer lateral for the drain to connect to.
I just had some landscapers who install French drains come out and take a look, they said it will not be a good idea and will likely not work because silt will eventually go down the drain pipe and into the sewer which is against code in my city.
I am wondering if you have had any issues with this yet? I have purchased all of the materials and I am ready to do this, however I don’t want to do it and then regret it 6 months or even 6 years later.
Hi Kelsey.
I have never had an issue with silt. However you may wish to take extra precautions when installing the pipe. First make sure the pipe is sitting on a clean and thick plastic sheet. Perhaps double it if your are concerned about it ripping. Make sure soil and dirt won’t flow into it on rainy days. Also don’t forget to cover the pipe in filter cloth. Finally make sure the gravel is really clean before laying it down. Perhaps give it a good hosing if it is dusty or dirty. Also you may want to consider adding a “clean out” or set it up so you can detach your pipe from the sewer line once in a while so you can flush it out if it does somehow start to collect silt. Although if you follow the instructions I am not sure where this silt would be coming from in any large quantities.
Please note that I can’t speak on behalf of your city’s bylaws so it is up to you to understand those bylaws and act accordingly.
Good luck setting it up. Let me know how it goes.
Your Plumber should know this anyway the french drain pipe or leech line should be wrapped with a heavy duty filter fabric to keep debris out of the drain pipe and placed in the trench with the holes on the pipe facing down. Now check the slope of the pipe, it’s wrapped with the holes on the bottom side time, to cover with gravel or rock.
The trouble that I have seen with all the doggie areas, and I have looked at many, they all use gravel or mulch. It is not sensible or easy to scoop poop off of these surfaces. I was having remodeling done and extended a toilet pipe to the yard. I have a toilet but don’t think I will use it. I am thinking of just cementing the area with the drain in the center. It will be covered unless I am hosing the area down. I need to talk to the contractor. I really hate to use the cement though in case I want to change things later. I can’t come up with any other surface. It looks like no one else has either. Any ideas welcome.
Could you use something like this? This link show brick ones but I think they are also made with different materials like concrete or rubber. ????
https://www.samsclub.com/sams/16in-patio-paver-16-patio-paver/prod16100129.ip
Great idea. Any chance you could change the name? With a grandfather and son named John ( You guessed It!) it just bugs me. A simple word change can avoid this. Thanks! Happy paws to you.