Seed starting is a right of passage for most gardeners. However, there are so many different ways to do it, that it can be overwhelming! Compare the pros and cons of seven different DIY seed starting trays that you can make at home. From using eggshells to toilet paper rolls for seed starting, learn which method works best.
The weather may be warming a bit, and it’s been many months since we had our green thumbs digging in the soil, so it’s no surprise that folks are just itching to get seeds started.
I’m hearing about or seeing a lot of different seed-starting blog posts floating around the web, from rookies who picked up a kit at the local hardware store to seasoned pros with pretty sophisticated grow ops.
I decided it was probably time for me to chime in and share what I know to be true about seed starting as well, so I put together this series.
I’ll share my experiences with all those super-adorable containers you can make at home (Part 1 – below) as well as some thoughts on the store-bought stuff (Part 2). So here goes the good, the bad, and the ugly of seed starting containers.
In this post, we will cover:
- The Best DIY Seed Starting Trays You Can Make At Home
- Newspaper Pots
- Toilet Tissue Roll Pots
- Egg Cartons
- Egg Shells
- Yogurt Containers
- Plastic Salad Containers
- Soil-Blocking Tool
- The Best Seed Starting Trays – Personal Preference
- DIY Seed Container FAQ
- More Seed Starting Tips
Note: for more information on the whole process of seed starting, check out Seed Starting 101 for the basics. The following is more in-depth on only one of the topics covered briefly in that post.
The Best DIY Seed Starting Trays You Can Make At Home
You absolutely, positively do not need to BUY anything to be successful at seed starting. Well, besides your seeds (if you haven’t saved your own) and some great sterilized seed starting mix, you can find most of what you need around the house. That includes homemade seed starter trays!
Not every oh-so-cute Pinterest-worthy repurposed container gives your seeds the best start, though. And some are just unnecessarily time-consuming for the home gardener. Here are the facts so you can choose the best trays for you and your garden.
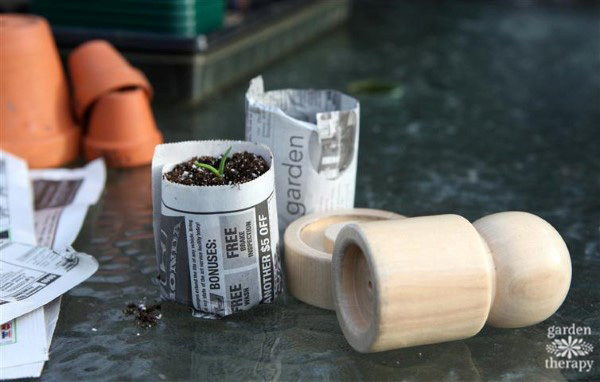
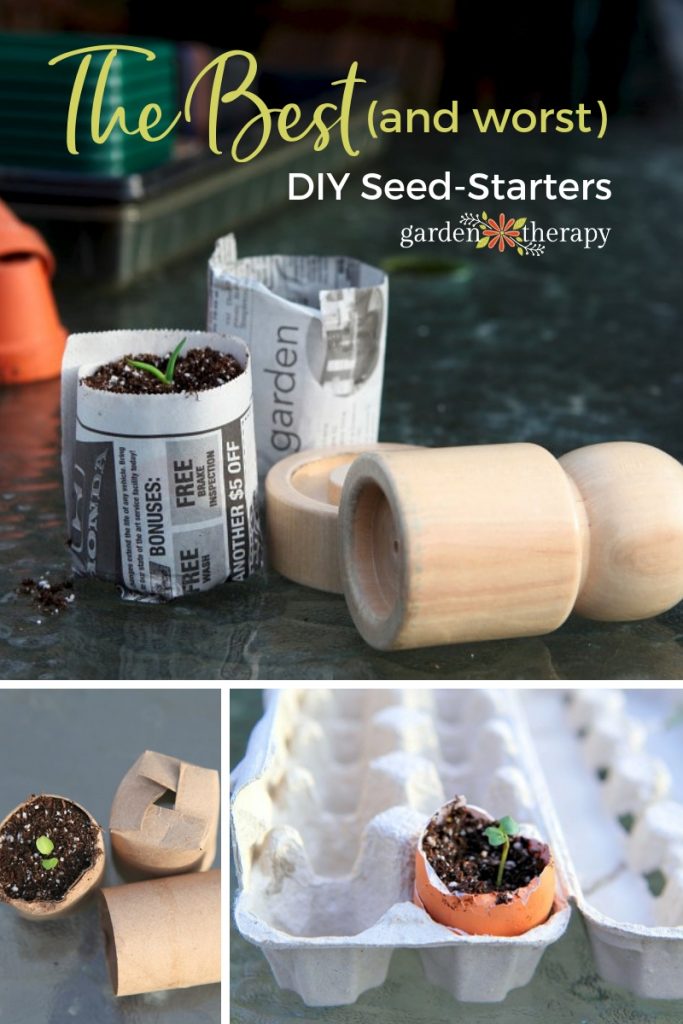
Newspaper Pots
VIDEO: How to Make Newspaper Seedling Pots
These wildly popular little containers can be easily made by cutting strips of newspaper and rolling them around a small tomato paste can, glass, or a fancy-dancy pot maker to make cheap little starters. Make sure the paper you choose uses a non-toxic soy-based ink, especially when growing veggies or an herb garden.
Newspaper is biodegradable, so you can plant your seedling out in the garden in the newspaper pot, and it’ll break down naturally from the bacteria and other organisms in the soil. That in itself can make it a great growing medium.
Pros: cheap, readily available, plantable pot breaks down easily.
Cons: can be flimsy when wet, can’t bottom-water delicate seedlings, time-consuming to make many, not a reusable seed tray.
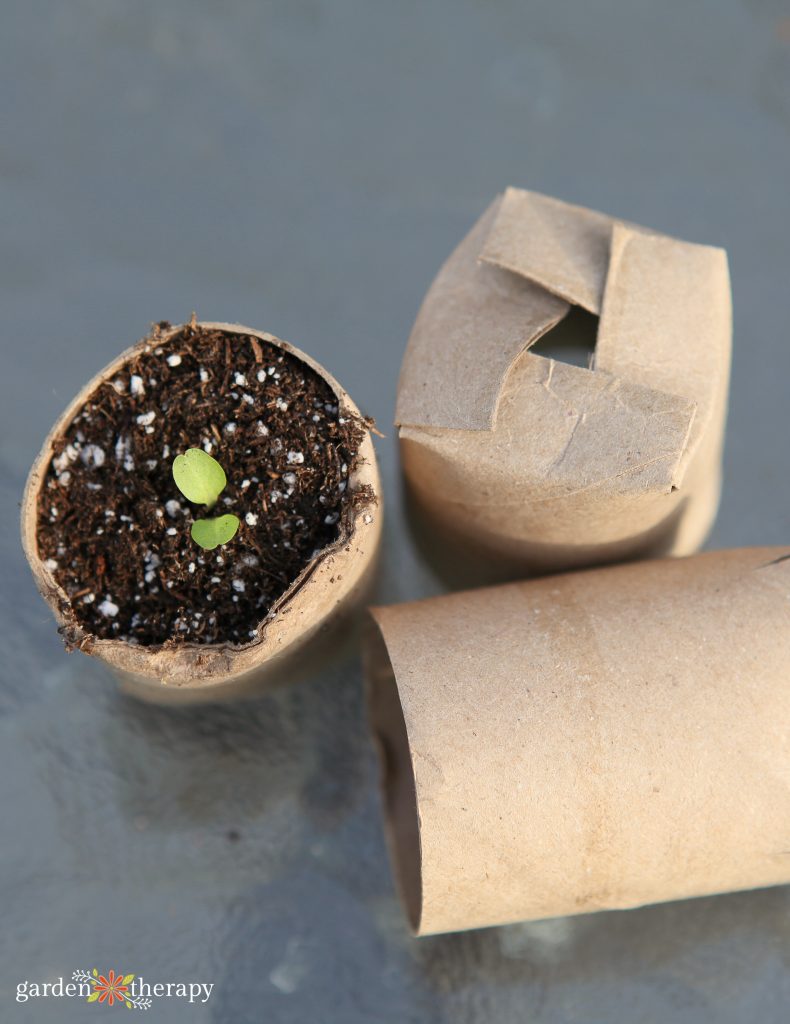
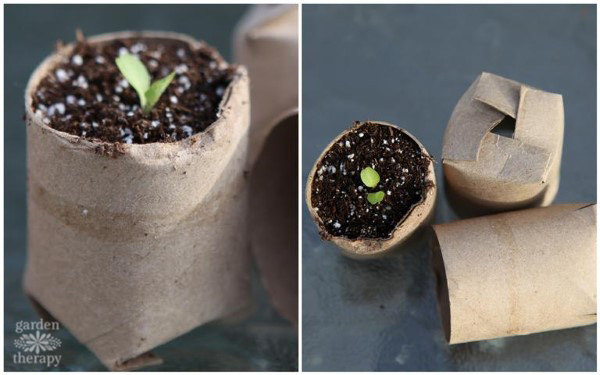
Toilet Tissue Roll Pots
These pots are a bit sturdier than the newspaper pots and, again, readily available. We all use toilet paper, right? To make a toilet paper roll into a simple diy seed starting container, cut the tissue roll in half. Then cut four ½” long slits on the bottom of one end, equally spaced to make four flaps you will fold over like closing a box.
In theory, the cardboard will break down in the soil so it can be planted out like the newspaper pots, BUT not all soil is equal. If your soil doesn’t have the necessary elements to break down this cardboard quickly, the roots will not be able to spread, and the plant will suffer.
If you do plant them in the ground, be sure to plant the whole container because if the lip stays above soil, it can wick moisture away from the roots.
This method of seed starting works well for cuttings and seeds that may take longer than average to germinate. But remember, without the right soil, your seedlings will likely have to be removed from these before planting, so choose wisely.
Pros: cheap, readily available, sturdy, hole in the bottom for drainage
Cons: time-consuming to make many, too small to be useful for most seedlings, will likely need to be removed when planting.
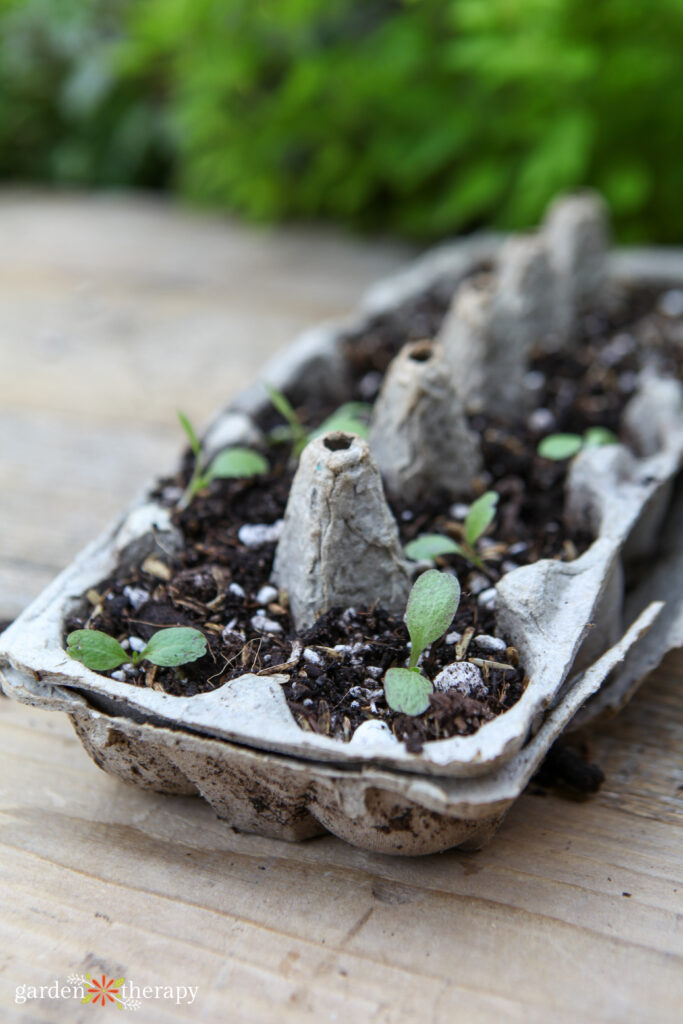
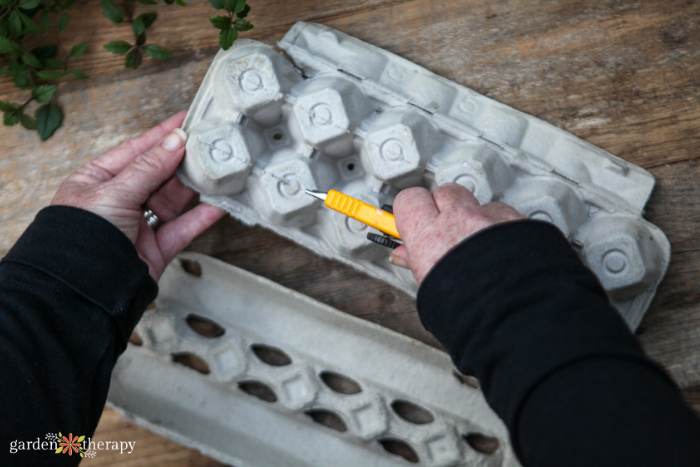
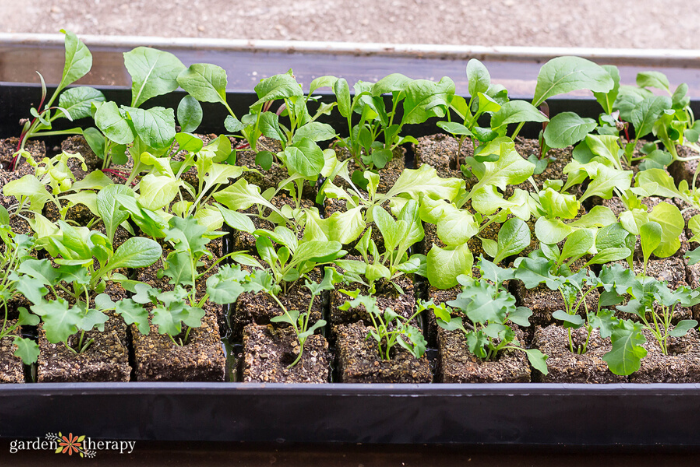
Egg Cartons
Egg cartons can be a good option for starting plants with shallow roots that you want to plant in a row, such as peas or lettuce. By the way, we’re talking about the cardboard variety, not styrofoam egg cartons here. Styrofoam never decomposes—I avoid it at all costs.
Grab a box cutter and use it to score (not cut!) a line through the middle of the divets in the carton on the bottom of each cell. You are basically doing this so that all seed germination can happen all together, but later, you can gently pull it apart to drop all the seeds into the dirt.
When it’s time to plant, simply make a trough in the dirt and place your egg carton halves inside. Pull the cartons apart so that the seeds fall through.
Pros: cheap, readily available, helps keep seeds spaced evenly apart
Cons: have to get the seeds from the container into the ground, which can be tricky, soil dries out quickly
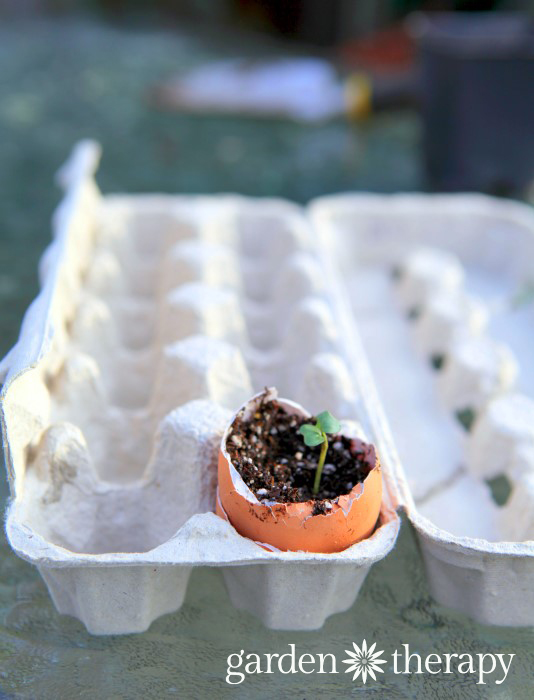
Egg Shells
These are so adorable, aren’t they? Using a cardboard egg carton filled with soil, you can find 12 little cells to start seeds. When you’re ready to plant, you can theoretically just grab one and plant it in the garden like the toilet tubes. And the eggshells couldn’t be more precious.
HOWEVER…I won’t even do a pros and cons list on them because that’s it for pros (cute) and never mind that you’ll have to remove the seedling from that shell and crush it before it hits the soil, they are just too darn small.
This means you will have to delicately extract that little seedling before it has its true leaves and plant it in a bigger, deeper container. I say, why not just start with a bigger container and save the seedling’s stress?
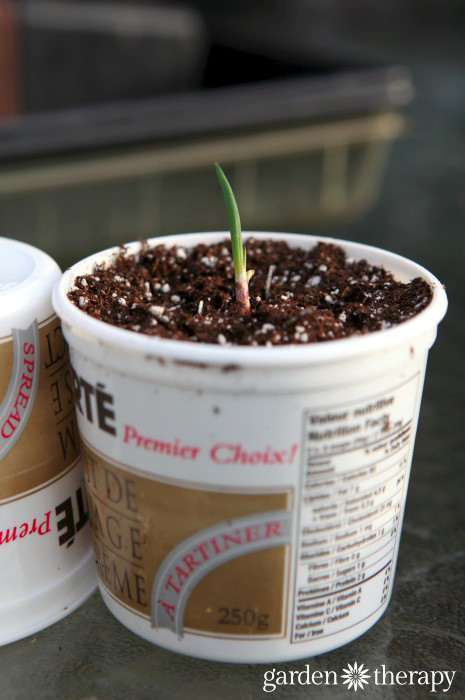
Yogurt Containers
They don’t have to be yogurt (shown here are cream cheese containers), but you get the picture. This is the equivalent of the plastic nursery cell seed pots. Just punch a few drain holes in the bottom and Bob’s your uncle. My only suggestion is to check your plastic for food safety to make sure it isn’t toxic to yourself or your plants.
Pros: cheap, readily available, sturdy, can last a lifetime, drainage holes for bottom watering, offer bigger pots
Cons: Unless you are fairly new to gardening, you probably have more nursery pots than yogurt containers, not all plastic is safe to reuse
Plastic Salad Containers
The box that you buy pre-washed baby greens in will make a lovely container, as will a chicken dome or a cake tray. Anything that has a bit of a bottom on it and a wonderful clear plastic lid will create a mini greenhouse akin to what you can buy in retail.
Cut a few holes in the lid for ventilation and check it often to make sure seedlings don’t succumb to the dreaded “damping off,” a fungal infection that kills the seedling. You can either set all your little homemade containers in these or line the bottom with soil and plant directly.
Pros: cheap, readily available in different dimensions, sturdy, is a built-in greenhouse with humidity control
Cons: not all plastic is safe to reuse, you must keep an eye on greenhouse domes and vent regularly to avoid damping-off, need to prick out and transplant germinated seedlings one by one which will inevitably cause some loss
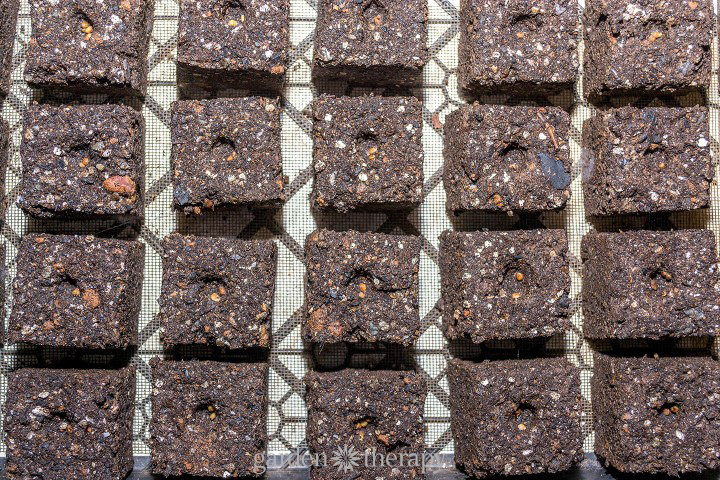
Soil-Blocking Tool
So, most likely, you don’t have a soil-blocking tool around your home. But they cost you about $35, and once you have one, it is the option with the least waste because it requires no additional materials outside of your seed-starting mix.
To use this handy tool, combine your seed starting mix with water in a bucket until it’s the same texture as wet sand. Grab your soil blocking tool and press it into the wet mix. Then, press the handle and you’ll have perfect little blocks of soil that you can add your seed into.
Pros: no-waste option, easiest way to transplant seedlings into the ground
Cons: have to purchase a tool
The Best Seed Starting Trays – Personal Preference
That’s my list. As you can see, making your own seed starting trays can be quite rewarding! Please comment if there are other starter trays out there that you have used and loved or hated. What it really comes down to is a personal preference.
I originally published this post many years ago and have gotten some more ideas over the years:
- Dollar store paper drinking cups
- Milk jug greenhouses
- Cardboard trays
- Soda Bottle Self Watering Planter
I’ve tried many ways, and I have my favourite, trusted, old standby seed-starting methodology, but you will find that in Part 2 of this series. Check out Seed Starting Containers: The Real Dirt – Part 2, where I write up the pros and cons of the store-bought seed starters out there: peat pellets, fibre pots, and more.
DIY Seed Container FAQ
I recommend bottom watering your seedlings. If you water overtop, the seeds can easily be dislodged from the soil or the delicate seedlings damaged. To bottom water, fill a tray with water and place your containers in the tray. The soil will slowly drink up the water. Leave the water in the tray until the top of the soil is damp, then pour out any remaining water from the tray.
It depends on how large your seed starting containers are. If they are quite small, such as the egg carton, they should only remain in there for a week or two after sprouting. Leaving seedlings in small pots with no nutrition will cause unwanted stress to the plant.
When seedlings have two true leaves, they’re ready to be transplanted into larger containers if keeping them inside or ready to move outside to harden off.
More Seed Starting Tips
- Seed Starting 101: Your Step-By-Step Guide for Starting Seeds
- How to Germinate Seeds: 4 Steps to Master Germination
- The Seed Shopping Handbook: Tips for Buying Seeds for Gardening
- Grow Light Shelf for Seed Starting Indoors
- Growing Herbs From Seed By Direct Sowing or Container Planting
- 25+ of the Best Annual Flowers to Start From Seed
A city girl who learned to garden and it changed everything. Author, artist, Master Gardener. Better living through plants.


I’ve been using the toilet paper rolls for years. I use the whole one, not cut in half. When I plant them I open the bottom up (where there’s usually roots growing out) so they can stretch their roots. Yes, the container eventually decomposes in my soil. And when you plant there’s no disturbing the roots. I also tear off the collar around the seedling It’s practically free. I start saving rolls in the fall. Have plenty by planting time.
Love your blog – hadn’t thought about a lot of those items as a seed starting kit, but I see it now! Thanks for sharing your knowledge!
Have used egg shells for years When setting seedling into ground/planter container, just tap shell bottom with spoon or knife handle to shatter the bottom.,, place shell neatly into soil. The roots grow right down into the soil, and shell adds calcium and other minerals to your soil. The most time consuming part is filling shells with heaping tablespoon of potting soil. Shatter the bottom of shells after filling with soil. Set shell into carton, place filled carton on a boot tray, add a cup of warm water daily, and water from the bottom. In a warm room, the seeds sprout even if they are not in direct sunshine
Hi Esther, I’m glad that works for you. The studies say that the eggshells take a long time to break down to add the calcium, and even so, it’s not water soluble so it needs to be consumed by soil wildlife (like worms and insects) to be available to the plant roots. That said, it can’t hurt! If you have plenty of them then why not? I would worry about restricting the upper roots so it might be best to crack the whole eggshell, rather than just the bottom. Have fun!
I tried putting crushed egg shells into my compost to add calcium to my garden. It’s probably ten years now since we did that and I can still find pieces of shell in my soil. They simply do not break down very well. I also stopped using coffee grounds. That’s my two cents worth on the egg shells. Happy gardening… ;-)
Their better off ground up in a coffee grinder and add to worm farm or scattered around the plants so the garden worms can make use of them. It helps worms digest plant matter and they poop it out in there casting
Egg shells also prevent root rot if crushed into the hole before you plant your seedlings but planted like your picture Stephanie it would take forever to breakdown 😊
Eggshells should be dried,heated then malt vinegar added to them to make a tea , check out Mr.Choi and Korean Natural farming